You’ve spent twenty minutes carefully blending your makeup under the bright lights of your latest Sephora haul, only to step out into the humid Singapore sun and realise your cheekbones look more like a muddy smudge than a sculpted masterpiece. It is a frustrating moment that many of us have faced while trying to figure out Contouring vs. Bronzing: What’s the Difference? while mimicking those flawless transition videos on our feeds.
We’ve all been there, standing in front of the vanity and wondering why a product that looks stunning on a friend leaves our own complexion looking dull. A 2023 industry report highlighted that 64 percent of women find it difficult to select the correct undertone for their skin, so you are certainly not alone in this struggle. It is normal to feel a sense of confusion when your makeup bag is full of products but your routine still feels like guesswork.
Mastering these techniques is the essential first step to reclaiming your confidence and elevating your daily beauty ritual. We are here to help you move past the trial and error phase so you can achieve a look that feels both professional and effortless. This guide provides a clear blueprint for choosing the right undertones for your skin and explains the exact placement strategies needed for a naturally defined finish.
Key Takeaways
- Learn how to distinguish between sculpting your features and adding a sun-kissed glow to ensure your makeup look remains polished and intentional.
- Master the nuances of Contouring vs. Bronzing: What’s the Difference? by identifying the cool-toned shadows needed for structure and the warm hues required for a radiant finish.
- Discover the precise facial zones for application, from defining your jawline and cheek hollows to highlighting the high points where the Singapore sun naturally hits your face.
- Uncover the secret to a seamless, long-lasting finish through expert blending techniques and strategic layering that helps your look withstand a busy day.
- Elevate your daily ritual by learning how to choose between definition, warmth, or a curated combination of both to suit your unique style and any occasion.
Understanding the Art of Contouring and Bronzing
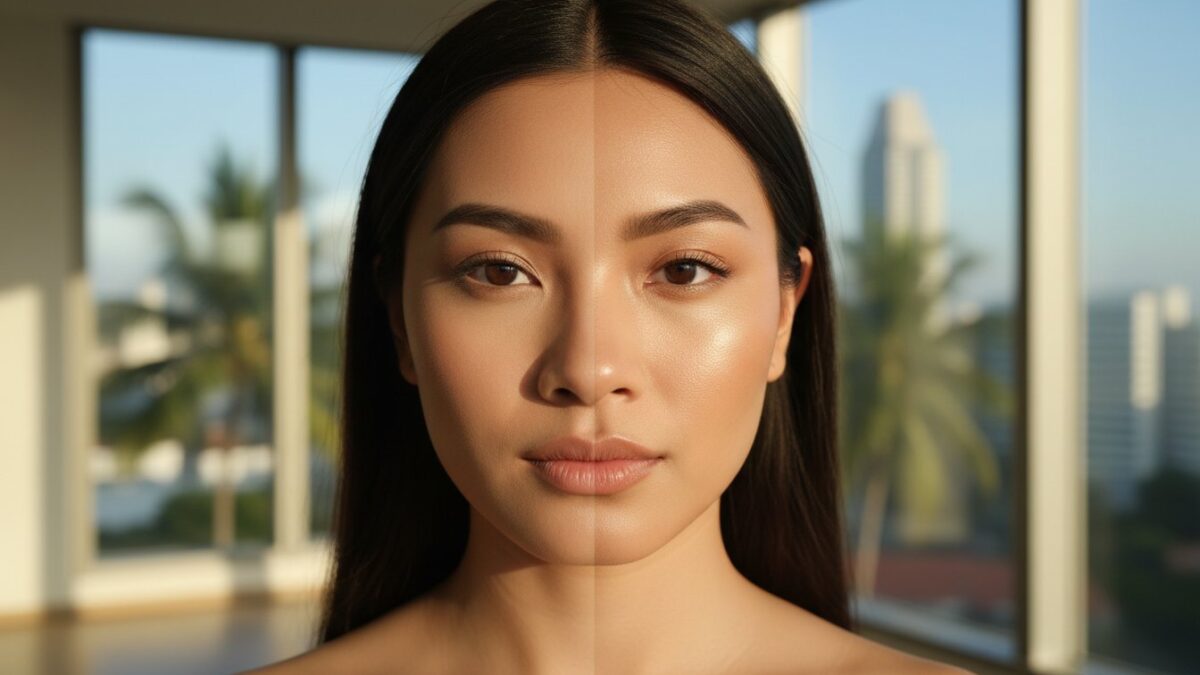
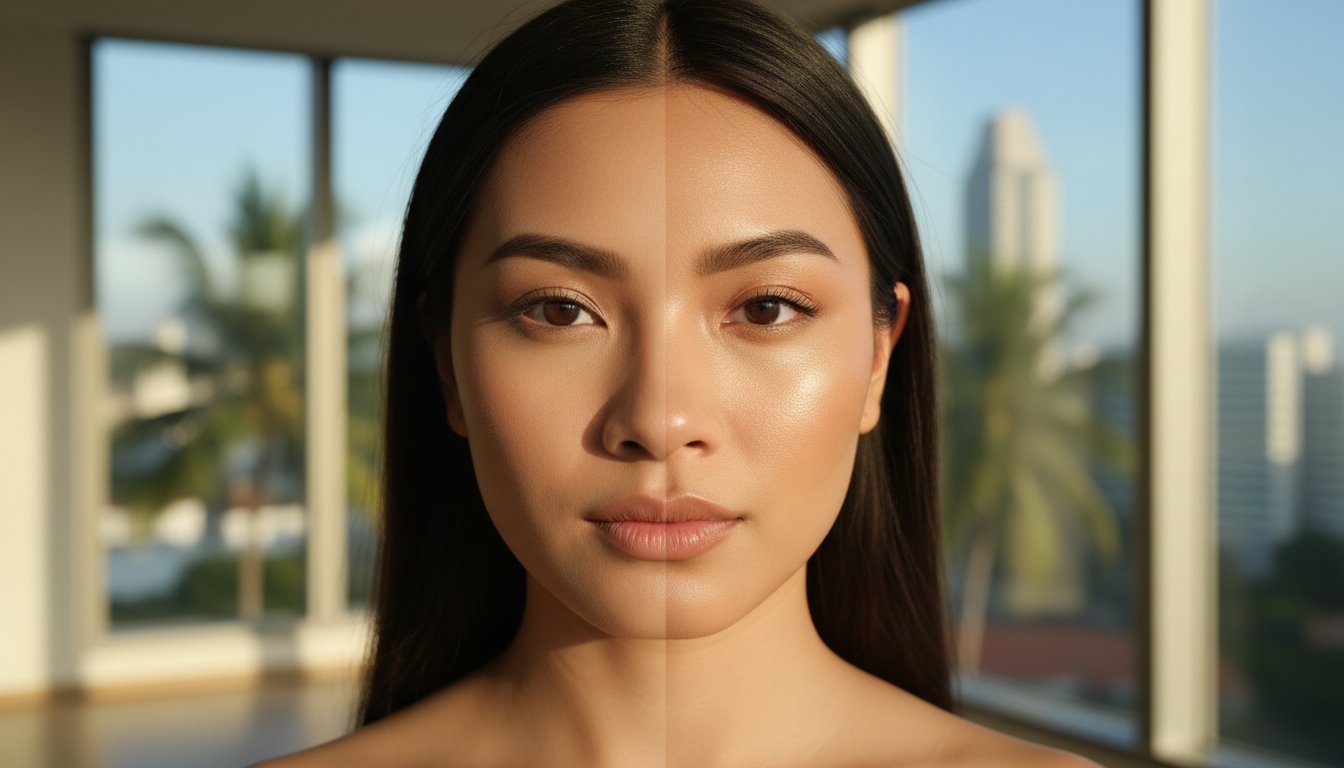
You’ve likely stood under the bright lights of a Sephora in ION Orchard, clutching two different brown powders and wondering which one actually belongs in your kit. It’s a common dilemma for many women. While both products sit in the same colour family, they serve entirely different masters. One is about structural integrity, while the other is about a healthy, sun-drenched glow. Understanding Contouring vs. Bronzing: What’s the Difference? is the secret to elevating your daily beauty ritual from basic to professional.
The confusion usually stems from the fact that both techniques involve darkening certain areas of the face. However, their intentions are polar opposites. Contouring is an architectural tool. It uses cool, ashy tones to recede features and create the illusion of depth. Bronzing is a lifestyle choice for your skin. It adds warmth, mimicking the way the sun hits your face after a weekend at Tanjong Beach Club. When you use them in tandem, you create a multi-dimensional look that feels both structured and alive. This layered approach ensures your face never looks flat or overly painted in Singapore’s harsh midday sun.
What Is Contouring? The Architecture of the Face
Think of contouring as the foundation of your facial geometry. The primary goal is to create depth and make specific areas recede, such as the hollows of your cheeks, the jawline, or the sides of your nose. To truly grasp What is Contouring?, you have to view your face as a canvas where light and shadow play a constant game of hide and seek. Because natural shadows aren’t sparkly or orange, matte finishes are non-negotiable for authentic contouring. Anything with a shimmer will catch the light, which completely defeats the purpose of creating a receding shadow. Contouring is a technique used to mimic natural shadows.
What Is Bronzing? Capturing the Golden Hour
If contouring is the blueprint, bronzing is the soft lighting that makes everything look better. The goal here is to add life and radiance to your complexion rather than altering your bone structure. Bronzer warms up the skin rather than changing its shape, making you look well-rested and vibrant. You have more freedom with finishes here, ranging from velvet mattes to subtle shimmers that catch the light beautifully. It’s about that effortless, healthy glow that suggests you’ve spent your morning outdoors rather than in an air-conditioned office. When asking Contouring vs. Bronzing: What’s the Difference?, remember that bronzer is your best friend for a soft, diffused warmth that radiates from within.
Undertones and Finishes: The Science of Selection
Mastering the nuances of Contouring vs. Bronzing: What’s the Difference? begins with a deep dive into your skin’s biology. It isn’t just about picking a darker shade; it’s about understanding how light interacts with your unique complexion. Without this foundation, even the most expensive products can look out of place under the bright Singapore sun. The goal is to enhance your natural architecture, not to mask it with heavy layers of pigment.
Cool vs. Warm: Finding Your Perfect Match
Start by identifying your undertone. Check the veins on your wrist. If they appear blue or purple, you have cool undertones. Green veins suggest a warm undertone. If you can’t quite tell, or if you look equally good in both silver and gold jewellery, you’re likely neutral. This distinction is vital because contouring is designed to mimic shadows. Natural shadows are never warm; they possess a cool, almost greyish tint. Using a warm-toned product for sculpting often leads to a muddy, orange appearance that looks artificial in daylight.
Conversely, your bronzer should lean warm to replicate a sun-kissed glow. To avoid a harsh look, select a bronzer only one or two shades deeper than your natural skin. This subtlety ensures you look healthy rather than overdone. As noted in a guide on Contouring for Beginners, selecting the right cool-toned sculpting shade is the first step to achieving professional results at home. Remember that lighting changes everything. What looks blended in your bathroom mirror might look stark under Singapore’s equatorial sun. Always check your reflection near a window to ensure your Contouring vs. Bronzing: What’s the Difference? application remains seamless.
Cream, Powder, or Liquid? Choosing the Right Formula
The formula you choose depends on your skin type and the local climate. Singapore’s humidity is a major factor in product performance. Consider these options for your kit:
- Cream Formulas: These are a favourite for a dewy, natural finish. They blend effortlessly into the skin, making them ideal for dry or mature complexions.
- Powder Formulas: If you struggle with an oily T-zone, powders are essential. They offer incredible longevity and stay put during a commute on the MRT.
- Liquid Products: For a sheer, lit-from-within radiance, liquids are unmatched. They provide a seamless transition that looks like skin, not makeup.
If you want to refine your daily routine further, you can explore our curated beauty guides for more professional tips. Selecting the right finish ensures your makeup doesn’t just look good when first applied, but stays fresh throughout a busy day in the city.
Mapping Your Face: Where to Apply for Maximum Impact
Achieving a professional finish starts with understanding your unique bone structure. While both techniques involve adding depth, their placement is what defines the final look. To truly understand Contouring vs. Bronzing: What’s the Difference?, you must treat your face like a canvas with specific zones designated for shadow and light.
The Contour Blueprint: Sculpting Your Features
Finding the hollows of your cheeks is simpler than it looks. Place your thumb at the top of your ear and feel for the dip just below your cheekbone. This is your target zone. Apply your contour here, stopping about two fingers’ width away from your mouth to keep the lift looking natural. For the jawline, avoid drawing a dark stripe directly on the bone. Instead, blend the product just underneath the jaw and back towards the ears to hide any unwanted softness.
If you’re refining your nose, use a small, dense brush to draw two thin, parallel lines down the bridge. In Singapore’s bright daylight, blending is your best friend. Ensure there are no visible edges so the structure looks built-in rather than painted on. This precision creates the architectural depth that defines a well-contoured face.
The Bronzing Arc: Where the Sun Naturally Hits
Bronzer is all about mimicking a weekend spent at Sentosa or the Botanic Gardens. Focus on the high points: your forehead, the bridge of your nose, and the very tops of your cheeks. The easiest way to master this is the Rule of 3. Start at the top of your forehead, sweep down to your cheekbone, and then curve back down to your jawline in a “3” shape. This ensures the warmth is distributed exactly where the sun would naturally kiss your skin.
Don’t stop at your chin. Always bring a small amount of bronzer down your neck to ensure your face and body match perfectly. This creates a halo effect, a soft perimeter of warmth that makes your complexion look radiant and cohesive. In a climate with 80% average humidity, using a light hand is essential to prevent the product from looking heavy as the day progresses.
Your tools are just as vital as the product itself. A dense, angled brush provides the control needed for precise contouring, allowing you to tuck pigment into the hollows of the face. For bronzing, reach for a large, fluffy brush that disperses pigment evenly for a diffused finish. Mastering these placements allows you to switch between a sharp, editorial look and a relaxed, sun-kissed vibe. When you understand Contouring vs. Bronzing: What’s the Difference? in terms of facial geometry, your makeup routine becomes an intentional act of self-care.
Mastering the Application: Tips for a Seamless Finish
Achieving a polished, professional look requires more than just the right palette; it demands a refined technique. The golden rule of makeup is simple: blending is your most vital step. Without it, even the most intentional application looks like streaks on a canvas rather than a natural enhancement. When you understand Contouring vs. Bronzing: What’s the Difference?, you realise that the goal is always a seamless transition between product and skin. Aim for a look that suggests you’ve just returned from a weekend in Sentosa, rather than one that looks like a heavy mask. Adopt a less is more approach, starting with a tiny amount of pigment and building up slowly to avoid a cakey appearance that can feel suffocating in the heat.
Layering for Longevity: The Secret to All-Day Wear
In Singapore’s relentless humidity, where levels often hit 80% or higher, your makeup faces a constant battle. If you want your definition to survive a commute on the MRT or a long lunch date, layering is your secret weapon. This technique involves a specific sequence to ensure your hard work doesn’t slide off by midday:
- Apply your cream products first to sculpt or bronze the face.
- Lock the cream in by layering a matching powder product directly over it.
- Use a light dusting of translucent powder to absorb excess sebum and set the base.
- Finish with a high-quality setting spray to meld these layers together for a skin-like finish.
This “doubling up” method acts as an insurance policy for your face, providing up to 12 hours of wear even during 30°C days. By sandwiching the colour between a cream base and a powder finish, you create a bond that resists perspiration and oil.
Avoiding Common Mistakes: From Muddy to Radiant
We’ve all been there; you step out of the house and realise your cheekbones look slightly muddy in the sunlight. If you’ve been heavy-handed, don’t reach for the makeup remover just yet. Use a clean, damp beauty sponge to bounce over the area, lifting excess pigment while leaving your foundation intact. This softens the edges without requiring a full restart. Always check your reflection in natural light before you leave. Bathroom LEDs are often deceptive, hiding harsh lines that become glaringly obvious under the midday sun.
One of the most frequent errors involves choosing the wrong texture for the job. When exploring Contouring vs. Bronzing: What’s the Difference?, remember that shadows are matte by nature. You should never use a shimmery product for contouring; adding glitter to a contour line immediately destroys the illusion of depth and structure. Keep the shimmer for your bronzer to mimic a healthy glow, and stick to cool, matte tones for your contour to keep the look sophisticated and believable.
Ready to elevate your daily beauty routine? Discover our curated beauty guides to refine your signature look and thrive with confidence.
Elevating Your Daily Ritual: Choosing Your Technique
Your morning makeup routine is more than just a sequence of steps. It’s a deliberate act of self-care and empowerment that sets the tone for your day in Singapore. When you understand Contouring vs. Bronzing: What’s the Difference?, you gain the power to manipulate light and shadow to suit your specific schedule. On days when you’re heading into high-stakes board meetings at Raffles Place, you might lean into the structure of a sharp contour. For a relaxed Sunday brunch at Dempsey Hill, a soft sweep of bronzer provides that effortless, sun-kissed glow that mirrors a weekend spent at Sentosa.
Beauty isn’t about hiding your face behind a mask. It’s about enhancing the unique architecture you already possess. You don’t always need to choose one over the other; often, the most sophisticated looks combine both techniques to create depth and warmth simultaneously. This curated approach to beauty allows you to express your personal style with precision and confidence.
Can You Use Bronzer as Contour? The Truth
Many women try to save space in their vanity by using bronzer to sculpt their cheekbones. This often results in a look that appears muddy or unnaturally orange. Bronzers are designed to mimic the sun’s warmth, so they usually contain gold or red undertones. Shadows are naturally cool and grey. Using a warm product to create a shadow confuses the eye. While a strictly matte, neutral bronzer can work for a very soft, everyday “non-contour” look, investing in dedicated products ensures your definition looks intentional rather than accidental. High-quality pigments make a world of difference in how the product interacts with Singapore’s humidity.
Building a Curated Makeup Wardrobe
A streamlined routine is the hallmark of a modern, organized woman. You don’t need dozens of palettes to look polished. Instead, focus on a few professional-grade products that truly serve your skin tone. Consider these essentials for your collection:
- A cream contour stick for seamless blending during the work week.
- A finely milled matte bronzer for a sophisticated, healthy radiance.
- Two high-quality brushes specifically shaped for placement and buffing.
Investing in professional tools changes the application process entirely. A dedicated contour brush allows for surgical precision, while a large, fluffy bronzing brush ensures a diffused finish. By curating your kit, you ensure that your daily ritual remains an inspiring part of your lifestyle rather than a cluttered chore. Mastering Contouring vs. Bronzing: What’s the Difference? allows you to step out every morning feeling like the most refined version of yourself.
Master Your Signature Radiance
Finding your perfect glow is about more than just picking up a palette; it’s about understanding how light and shadow interact with your unique features. You’ve now mastered the essentials of Contouring vs. Bronzing: What’s the Difference? and can distinguish between the cool-toned shadows that define your bone structure and the sun-kissed warmth that brings life to your complexion. Precision matters. Use matte textures for sculpting and reach for those luminous finishes when you want to mimic a weekend spent at Sentosa Cove. By selecting products that align with your specific undertones, you’ll ensure a finish that feels intentional and polished. Focus on the 3-shape application for bronzer to hit the forehead, cheekbones, and jawline effectively.
Confidence comes from knowing exactly how to enhance what you already have. Whether you’re preparing for a high-stakes meeting in the CBD or a relaxed brunch, these techniques offer a blueprint for a more sophisticated version of yourself. If you’re ready to refine your routine further, we’re here to help. Discover more beauty secrets and elevate your lifestyle with our curated guides. We provide expert-led beauty advice for the modern woman and curated recommendations for a sophisticated lifestyle. Step out with the assurance that your makeup isn’t just applied; it’s curated for your best self.
Frequently Asked Questions
Should I apply bronzer or contour first?
You should apply your contour first to establish the structural shadows of your face before adding warmth with bronzer. Think of contour as the architectural blueprint that defines your bone structure and bronzer as the finishing touch that provides a sun-kissed glow. By layering in this specific order, you ensure your features look sculpted and your complexion remains radiant rather than muddy.
Can I use the same brush for both bronzer and contour?
It is best to use separate brushes because these two products require different levels of precision and placement. A small, dense, angled brush is ideal for the targeted application needed to carve out cheekbones or the jawline. For bronzer, reach for a large, fluffy brush to distribute the pigment across the high points of your face where the sun naturally hits. Using the same brush can mix cool and warm tones, which often results in a messy finish.
Is contouring only for special occasions or can I do it daily?
You can absolutely incorporate contouring into your daily routine by opting for a “soft sculpt” technique using cream products. While heavy, dramatic sculpting is often reserved for evening events, a subtle application takes less than 3 minutes and enhances your natural features for the office. About 65 percent of modern women now use a light contour daily to add dimension to their face under bright fluorescent lights.
How do I choose a contour shade if I have very fair skin?
Look for a cool-toned taupe or a grey-leaning “shadow” shade that mimics the natural tint of a shadow on your skin. Understanding contouring vs. bronzing: what’s the difference? is vital here because many fair-skinned women mistakenly buy warm browns that look orange on their complexion. Avoid any product with red or golden undertones, as these function as bronzers rather than sculpting tools.
What is the best way to blend cream contour without moving my foundation?
The most effective method is to use a damp beauty sponge or a dense brush to press the product into your skin using a stippling motion. Never drag the brush or sponge across your face, as this friction pulls the foundation underneath and creates visible streaks. By bouncing the tool gently over the edges, you create a seamless transition that keeps your base intact and your sculpt perfectly diffused.
Does bronzer go on before or after blush?
Apply your bronzer before your blush to create a warm, cohesive canvas for your pop of colour. This allows the blush to sit beautifully on the apples of your cheeks and blend into the warmth of the bronzer without any harsh lines. It is a technique favoured by 8 out of 10 professional makeup artists to ensure the face looks dimensional and healthy rather than flat.
What happens if my contour looks too grey or muddy?
If your sculpt looks muddy, you have likely used too much product or a shade that is too dark for your skin tone. You can fix this by using a clean buffing brush to blend the edges with a tiny amount of translucent powder. If the grey tone is too intense, lightly dusting a warm bronzer over the area can help balance the pigments and make the shadow look more natural.
How do I stop my bronzer from looking patchy during the day?
You must set your liquid foundation with a light layer of translucent powder before you apply any powder bronzer. Applying powder directly onto a “wet” or tacky base is the primary reason for patchiness and uneven colour. Given Singapore’s 80 percent average humidity, using a high-quality setting spray after your application is also essential to prevent pigments from breaking down or sliding as the day progresses.
Eligible SMEs can now receive up to 50% grant support for our Digital Marketing Solutions. Click to find out more!

 1
1  2
2 The Modern Woman’s Guide to Thai Massage in Singapore
April 29, 2026 3
3  4
4 